Saturday 3 September 2011

Finally, a mani that hasn't got Konading in it!

This mani is inspired by "Hime Gyaru", which in Japanese means "princess"...I think...it's basically anything girly, glittery,bows,pearls, Sparkles.. This is a very suble Hime Gyaru mani in comparison to some!
so first I started off with a base, then two coats of Misguided in Misbehave


I then added my favourite, a ceramic flower, to my ring finger, and a tiny pearl to the corner of each other nail. Like I said, it's very subtle, but I dont have enough gems/ sparklies to go OTT atm :D


Friday 2 September 2011

A Starry Mani

Mooorning everyone!  Once again, I'm using my bundle monster plates!  I found this really cool staarry pattern,  and after I did it, it reminded me slightly of that ball that was in Toy Story! I obviously realise not all of you are Disney fans like me :D but it's what it looks like :)
so after doing a base coat, I then did two coats of yellow, Barry M #134.  This was still streaky even after two coats, it is quite old, so I had to fill in the gaps a bit.  And I'm not sure why the lighting/ the nail polish makes me fingers look so red!


And then I used Barry M #291 Cobalt Blue and the bundle monster plate #B20 for the design.  The blue didn't come out as bold as I would have liked; I definitely think the Konad polishes are better for stamping!


A Leafy Mani

I recently bought some Monster Bundle plates off of Amazon.co.uk, which were so cheap! They came in a pack of 21 so there was loads to choose from! For this mani I started with two thickish coats of Barry M mint green.  I know it looks blue in the pictures, but it's definitely green :)


Sorry for the blurry pictures! Anywhooo I then used Bundle Monster plate #, and used the special konad polish in black.


Tuesday 23 August 2011

A lovely molten gold!

In Sallys recently I noticed that Nail Pro had an offer that when you buy one polish you get the second half price, so I chose a black, and this beaut! They also had one called Molten Copper, but this one definitely caught my eye!

So this is two coats, there are so many lovely colours!


Some Sally Hansen polishes...

When I was over in the states, I bought looooads of polishes back because they were so much cheaper over there! I also noticed they had loads of Sally Hansens, all I can ever get in the UK are nail strengtheners, no colours! So I picked up some insta drys! These ones have a wide brush, so the application is really neat, and the polishes aren't too thin, so two coats is definitely more than enough! This is Mauve it


This is Uptempo Plum. This looked so lovely in the bottle!


But then no matter what angle I took pictures I couldnt find any of the prettiness on my nails! boooo.


Sunday 21 August 2011

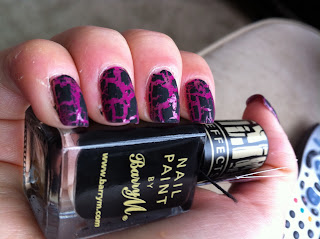
Using the Barry M shatter

So I went out and bought the Barry M  shatter polish :) Also, Revlon had a limited edition range of scented polishes, so I went and got two :)
So this is two coats of Revlon #375 Passion Fruit.  You can only smell the prettyness once the nail varnish dries btw!


Then I added one thick coat of Barry M shatter polish, you have to work quick with it though!

Barry M Pastel shade with a ceramic flower

Barry M released a lovely range of pastel shades, which I did go out and buy all of :D but for this post, I'll be using the lilac, which i think is lovely!I thought I should mention, I use OPI nail envy as a base, because it dries really thin and doesn't chip. then, I did two coats of the lilac

and theeeen I put a small ceramic flower on my ring finger to complete it!  I ordered the ceramic flowers off of a website called www.vivalanails.com.  the ceramic flowers look lovely on, but its a good idea to stick them on when the layer of polish is half dry, and press it in gently with your finger.  I then put a coat of top coat over the top and around the flower to secure it in place.